The Complete Answer, Three Routes

Turn Your Clothing Design Into a Factory-Ready DXF Pattern

Three routes get you there. Commission a freelance pattern maker, who charges roughly $150 to $500 per style and works to a queue measured in days or weeks. Learn pattern CAD yourself in CLO3D, Optitex or Lectra Modaris, which buys you full control at the price of a long learning curve. Or order the pattern as a product: you submit the design, a professional pattern maker cuts it, and AAMA/ASTM DXF-2 files come back. Smasher Studio is the third route, at $29 simple, $59 standard and $129 complex, classified from the garment rather than chosen by you, first revision free, delivered 48 hours to 5 days from the moment a maker claims the order. All three are explained below.

Generated in the studio
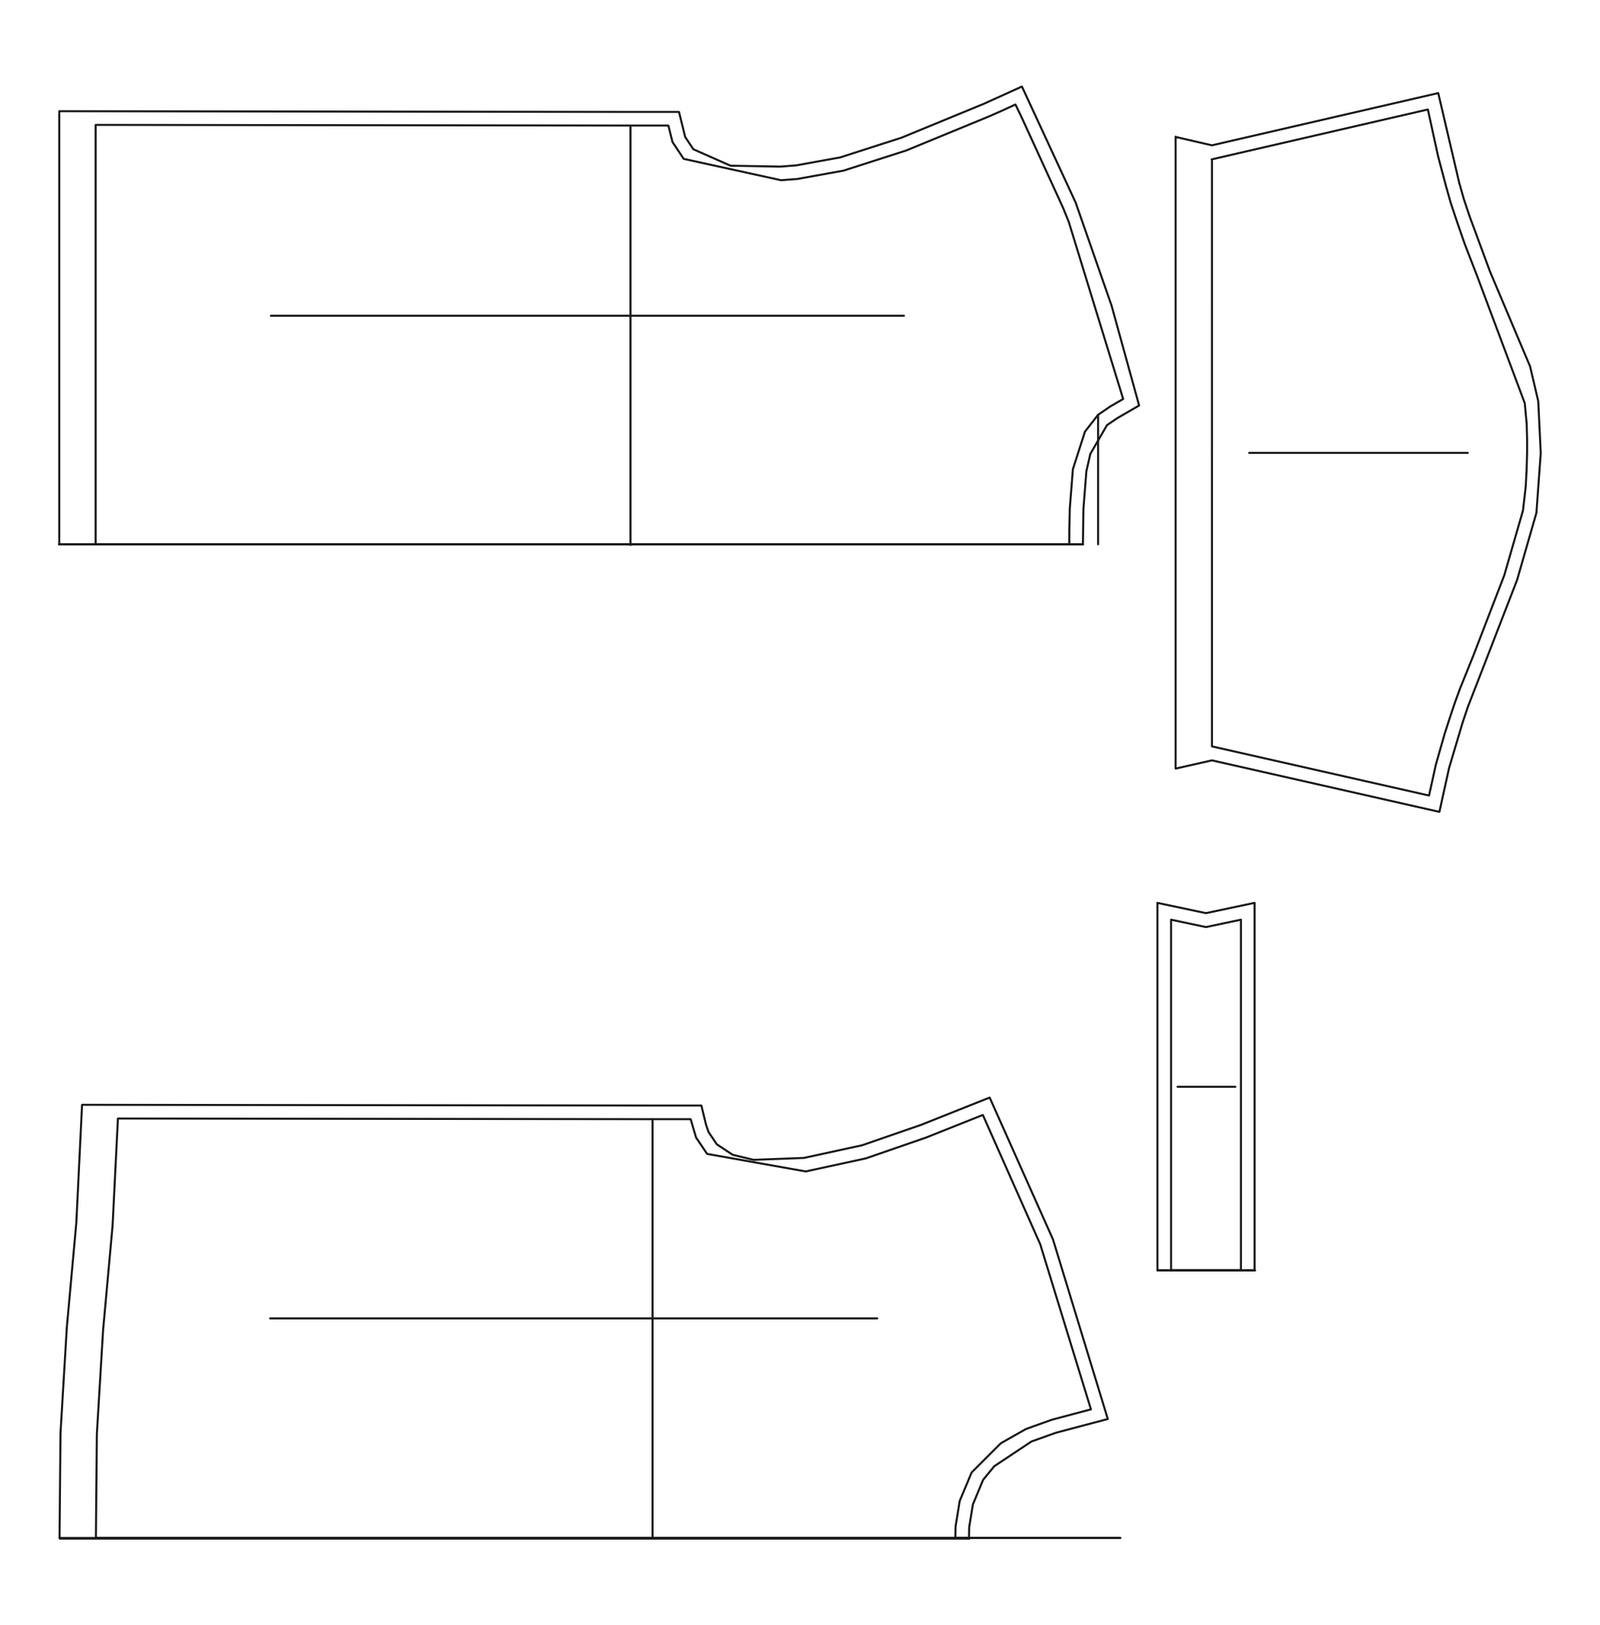
DXF pattern, nested
DXF pattern, nested
Four angles, one garment
5s brand film, AI

The Three Routes From Design to Pattern

A design is an image. A pattern is cutting geometry. Something has to convert one into the other, and in 2026 that something is still a trained pattern maker, whether you hire one, become one, or buy their output. Here is what each route actually costs you.

1

Commission a freelance pattern maker

$150 to $500 per style

Days to weeks

The artisanal route, and still the standard one. You send sketches, measurements and reference garments, and an experienced pattern maker drafts the pattern, usually in the same CAD systems a factory uses. The relationship is the value: a good pattern maker will question your design where it will not sew, and their judgement on ease and fit is not something you can buy in a file format. The friction is scheduling and cost. Individual makers work a queue, briefs travel by email, and per-style pricing adds up quickly across a collection.

Best when you have one signature style that has to be right, or an ongoing relationship worth building.

2

Learn pattern CAD and draft it yourself

Software subscription, plus your time

Months to competence

CLO3D is the best-known 3D route and simulates the garment on an avatar as you draft, which makes fit problems visible before fabric is cut. Optitex, Lectra Modaris and Gerber AccuMark are the industry 2D systems, and Seamly2D is the free option. All of them export DXF. The learning curve is real and it is not mostly about the software: flat pattern drafting is a craft with its own logic, and a tool cannot supply the judgement about ease, grain and construction that the craft consists of.

Best when pattern making will be a core in-house capability and you are developing many styles per year.

3

Order the pattern as a product

$29 to $129 per garment

48 hours to 5 days from claim

The productized route removes the scheduling problem rather than the human. You submit the design and the garment details through a fixed intake, a professional pattern maker claims the order and cuts the pattern, and the AAMA/ASTM DXF-2 files come back to you at a price fixed before the work starts. What you give up is the conversation: there is no back and forth with the maker while they draft, which is why the first revision is part of the price. This is the route Smasher Studio operates, and the rest of this page describes it in detail.

Best when you have a design, a deadline, and no drafting background you want to acquire first.

How the Productized Route Works Here

Four stages, no meetings. The design work can happen on the platform or somewhere else entirely, and the pattern is cut by a person either way.

1

Bring or make the design

Upload what you already have, whether that is a flat sketch, a photograph of a garment you are adapting, or a reference image, or design the piece in the studio with AI assistance and iterate until the silhouette and details are right. Image generation runs on credits and free accounts receive 50 credits per month. Nothing about the pattern order requires the design to have been made here.

2

Place the order and confirm the details

You confirm a short recap before paying: fabric and its behaviour, the base size to cut, your intended size range, and any artwork placement. These are the details a pattern maker would ask for in a first email, collected once. Complexity is classified server-side from the garment, so the tier is derived rather than selected, and you see the price before you pay.

3

A pattern maker claims and cuts

The order goes to professional pattern makers, and delivery timing runs from the moment one claims it. They draft the pattern in production CAD, name and annotate every piece, and export the AAMA/ASTM DXF-2 files. The fee is passed to the maker in full, which is why the person cutting your pattern is doing it at their own rate rather than at a marketplace discount.

4

Files land, then a revision if you need one

The DXF files arrive on your Projects page. Cut a sample, or send them straight to your factory. Your first revision is free and covers corrections to fit and detail. If you selected add-ons, they arrive with the same delivery, authored by the same maker.

What It Costs, and What Is Priced Separately

One fee per garment, set by how many pattern pieces the garment needs. Complexity is classified automatically from the garment rather than chosen at checkout, so nobody has to estimate their own tier, and the price is shown before payment.

Simple

$29

Roughly 2 to 6 pieces

T-shirt, tank top, basic skirt. Delivered in as little as 48 hours from claim.

Standard

$59

Roughly 7 to 15 pieces

Hoodie, dress, trousers. Delivered in as little as 72 hours from claim.

Complex

$129

16 or more pieces

Structured blazer, coat, lined gown. Delivered in as little as 5 days from claim.

The four add-ons

The fee buys the production DXF pattern files and your first revision. These four are priced separately and can be attached to the order at any point before delivery, because a first order is usually a fit sample in one size where none of them are needed yet.

Grading

$15

Your base size expanded across the full size range, with the grade rule file.

Factory tech pack

$10

The specification document: BOM, size chart with points of measure, construction notes, colors.

Marker layout

$10

The nesting plan that tells the cutting room how to place pieces for minimum fabric waste.

Seam allowances

$5

Allowances applied in the files themselves, to the convention your factory works to.

First revision free, further revisions $5 each. Delivery times run from the moment a pattern maker claims the order. Nothing is charged before checkout completes.

What Factory-Ready Actually Means

The phrase gets used loosely. In a cutting room it has a precise meaning, and a file either satisfies it or gets sent back. Six things separate a pattern a factory can run from a drawing of a pattern.

Closed piece boundaries

Every pattern piece is a single closed outline. Open contours and duplicated overlapping lines are the most common reason a file is rejected on import, because a cutting system cannot compute a path around a shape that does not close.

Notches that correspond

Notches are the small marks that tell an operator which edge joins which, and in which direction. A sleeve head and an armhole carry matched notches so the ease is distributed correctly. Without them the sewing line guesses, and sleeves twist.

Grainlines on every piece

The grainline tells the cutter how the piece sits relative to the fabric weave. Rotate a piece off grain and the finished garment twists on the body after the first wash. On a bias-cut piece the grainline is the design, not a formality.

Piece names, cut quantities and fabric type

Each piece is labelled with its name, how many to cut, whether it is cut on the fold, whether it mirrors, and which material it belongs to, shell, lining or interlining. This is the metadata a marker maker and a cutting room work from.

A stated seam allowance convention

A pattern is drafted on the net line, the stitch line, and the allowance is added around it. Factories need to know which convention a file follows, because a piece cut with a 1 cm allowance where the maker assumed 1.5 cm changes the finished measurement. Seam allowances are available as a $5 add-on when you want them applied in the files themselves.

The right file, in the right standard

AAMA/ASTM DXF-2 is the apparel interchange profile, and it is what a factory means by a DXF pattern. It imports into Lectra, Gerber, Optitex and the rest without redrawing. A generic DXF from a drawing tool carries lines but no pattern semantics, so a factory has to rebuild it, and most decline.

Why a Factory Wants a Pattern, Not a Render

A render shows how a garment looks on a body. A pattern encodes how flat fabric becomes that shape. The gap between the two is where every unwearable sample comes from. A photoreal image can show a sleeve that no cutting plan produces, a seam that cannot be sewn in one operation, or a fit that only exists because the model is standing a particular way. None of that is visible until someone tries to cut it.

This is also why sending a factory an image and asking them to work it out is expensive rather than free. Some will decline. Those that accept will draft a pattern themselves, charge for it, and interpret every ambiguity in whichever direction is cheapest for them to sew. You lose control of the fit and you pay for the drafting anyway, just without seeing the invoice line.

The design work is genuinely faster than it used to be, and AI is why. Iterating a silhouette used to mean a sketch and a week; now it means a sentence and a minute. But the conversion into cutting geometry is craft, and pretending otherwise is how brands end up with a folder of DXF files no factory will accept. Keeping a human on that step is the whole design of this service.

What a Factory Does With Your Files

Knowing where the file goes explains why each requirement exists. Your pattern passes through four stages once it lands on a factory server.

1

Import and check

A technician imports the DXF into their CAD system and runs a validity check: closed pieces, matched notch counts on joining edges, sane piece names, present grainlines. This is where a bad file dies, usually within ten minutes of arriving.

2

Sample cutting

The base size is cut and sewn as a fit sample. You review it on a body or a dress form and note what changes. This is the round the free first revision exists for, and it is why the first order rarely needs the full size range.

3

Grading and marker making

Once the fit is signed off, the pattern is expanded across your size range and a marker is laid to minimise fabric consumption. Both stages are available as add-ons here if you would rather they arrive with the pattern, at $15 and $10.

4

Bulk cutting

The marker drives an automated cutter or a manual spreading table, and the pieces move to the sewing line. From this point the pattern is a production asset: every unit in the run comes from it, and a fault in it is a fault in every garment.

When This Is the Wrong Route

A productized service is a good fit for most first patterns and a poor fit for a few specific cases. It is worth saying which.

Bras, corsetry and swimwear with structure

These live or die on millimetre fit against a specific body and a specific elastic. They want a specialist you can iterate with over several fittings, not a fixed-scope order.

Bespoke tailoring to one person

A pattern drafted to individual measurements is a different discipline from a graded production pattern. A tailor is the right answer, and a factory is not involved.

You already own a graded block that works

If your fit is proven, modifying your existing block is cheaper and safer than commissioning a new pattern that will need its own fit round.

You are iterating fit weekly

At that cadence, per-style fees and delivery windows become the bottleneck. Learning pattern CAD or retaining a maker on a monthly basis will serve you better.

Frequently Asked Questions

How do I turn my clothing design into a factory-ready DXF pattern?+
A pattern maker converts the design into flat pattern pieces and exports them as AAMA/ASTM DXF-2 files. There are three ways to reach that point. You can commission a freelance pattern maker, which costs roughly $150 to $500 per style and takes days to weeks depending on their queue. You can learn pattern CAD yourself in CLO3D, Optitex, Lectra Modaris or Gerber AccuMark, which gives you full control at the cost of a long learning curve and a software subscription. Or you can order the pattern as a product: you submit the design and the garment details, a professional pattern maker cuts it, and the DXF files come back to you. Smasher Studio is the third option, from $29 per garment.
Can AI generate a DXF pattern directly from an image?+
Not to production standard, and it is worth being direct about this. Image models produce renders, not cutting geometry. A production pattern encodes ease, seam behaviour, fabric stretch, grainline, and how a specific factory will assemble the piece, and none of that is recoverable from a picture of a garment. Automated tracing tools exist and they are useful for rough blocks, but factories reject files whose pieces do not close, whose notches do not correspond, and whose grainlines are missing. On this platform the AI does the design and visualisation work and a human pattern maker cuts the pattern. That split is deliberate.
What is a DXF-2 file, and why do factories ask for it?+
DXF-2 refers to the AAMA/ASTM interchange standard for apparel pattern data, a constrained profile of the DXF format that carries pattern semantics rather than generic drawing lines. It stores each piece as a closed boundary with its internal lines, notches, drill holes, grainline, piece name, cut quantity, and fabric type. Factories ask for it because it imports directly into the CAD and cutting systems they already run, such as Lectra, Gerber and Optitex, without anyone redrawing your garment by hand. A plain DXF exported from a general drawing tool usually opens but carries none of that structure, which is why it gets sent back.
How much does a production pattern cost?+
On Smasher Studio the fee is per garment and set by complexity: $29 for a simple garment of roughly 2 to 6 pieces such as a t-shirt, tank top or basic skirt, $59 for a standard garment of roughly 7 to 15 pieces such as a hoodie, dress or trousers, and $129 for a complex garment of 16 or more pieces such as a structured blazer, a coat or a lined gown. Complexity is classified from the garment itself rather than chosen at checkout, so the tier cannot be talked down or accidentally understated. The fee covers the production DXF pattern files, and your first revision. Freelance pattern makers typically charge $150 to $500 for the same deliverable.
What exactly do I receive, and what costs extra?+
The fee buys the production DXF pattern files in AAMA/ASTM DXF-2 form, cut in your chosen base size, plus your first revision. Four things are priced separately as add-ons you can attach to the order at any point before delivery: grading to your full size range with the grade rule file at $15, the factory tech pack at $10, the marker layout at $10, and seam allowances at $5. They are listed as add-ons rather than folded into the headline price because most first orders are a fit sample in one size, where none of the four are needed yet.
Do I need a tech pack as well as a pattern?+
For a first fit sample, often not. A pattern tells the factory what shape to cut; a tech pack tells them what to build it from and how to assemble it. Small workshops cutting a single sample from fabric you supply can usually work from the pattern and a conversation. A factory quoting bulk production will want the specification document, because they cannot cost materials or plan a sewing line without it. On this platform the factory tech pack is a $10 add-on written by the same pattern maker who cuts your pattern, which keeps the spec and the cutting files consistent with each other.
Could I just learn CLO3D or Modaris and do it myself?+
Yes, and if you intend to develop many styles a year it is probably the right long-term move. Pattern CAD gives you complete control, instant iteration, and no per-style fee. The honest cost is time: expect months to reach production quality, because the software is the easy half and flat pattern drafting is the hard half. Owning the skill matters most when you are iterating fit repeatedly. Buying the pattern makes more sense when you have a handful of styles, a deadline, or no drafting background and no wish to acquire one before your first sample.
How long does it take, and what happens if the pattern is wrong?+
Delivery runs from the moment a pattern maker claims your order, not from checkout: as little as 48 hours for a simple garment, 72 hours for standard, and 5 days for complex. Your first revision is free and covers fit and detail corrections, such as an adjusted measurement, a repositioned pocket or a construction change. Further revisions are $5 each. A different silhouette is a new order rather than a revision, because it is a new pattern rather than a correction to an existing one.

Related Guides

Reading this in French? Du design au patron DXF prêt pour l'usine.

From Design to Cutting Files

Bring a design or make one in the studio, and have a professional pattern maker cut the production DXF your factory can run. From $29 per garment, first revision free.

Turn Your Clothing Design Into a Factory-Ready DXF Pattern | Smasher Studio | Smasher Studio